iOS GameplayKitを使って見ました
@ITに、「iOS GameplayKitの「Agents, Goals, and Behaviors」で作る、鬼ごっごの鬼AI」という面白そうな記事がありましたので、試してみました。
GameplayKitを初めて使いましたが、簡単に使えるという印象を持ちました。 この連載には、AI的な要素もありそうで今後が楽しみです。
リンク
NotificationCenterを使ってみました
はじめに
iOSアプリで、ある画面で処理したタイミングで別画面の表示を更新したいことがあります。 このような場合には、Observerデザインパターンが有効です。 Observerパターンは、Listenerパターンとも呼ばれます。
Java言語の場合にはListenerをインタフェースとして実装することが多いです。
swiftでは、Observerデザインパターン用のクラスとしてNotificationCenterが提供されています。
実装
- 登録
- 登録解除
- 通知を送信
// Notification名を登録する
public extension Notification {
    public static let MyNotificationName = Notification.Name("Notification.MyNotification")
    public static let MyNotificationNameUserInfo = Notification.Name("Notification.MyNotificationUserInfo”)
}
class Hoge : NSObject {
    override init() {
        super.init()
    // 登録
        NotificationCenter.default.addObserver(self, selector: #selector(self.update), name: Notification.MyNotificationName, object: nil);

    // 通知を受けるメソッドです
    func update(notification: NSNotification) {
        print("receive Notification!")
    }

    // 登録解除
    func removeObserver() {
        NotificationCenter.default.removeObserver(self, name: Notification.MyNotificationName, object: nil)
    }
}
var hoge = Hoge()

// 通知する
NotificationCenter.default.post(name: Notification.MyNotificationName object: nil)
通知するタイミングでデータを受け渡したい場合には、UserInfoが使えます。
class HogeUserInfo : NSObject {
    override init() {
        super.init()
        // 受信側(登録)
        NotificationCenter.default.addObserver(self, selector: #selector(self.update), name: MyNotificationNameUserInfo, object: nil)
    }

    // 通知を受けるメソッドです
    func update(notification: NSNotification) {
        print("receive Notification!")

        guard let userInfo = notification.userInfo,
            let message  = userInfo["message"] as? String,
            let date     = userInfo["date"]    as? Date else {
                print("No userInfo found in notification")
                return
        }
        print(message);
        print(date);
    }
}

var hogeUserInfo = HogeUserInfo()

// 通知する
NotificationCenter.default.post(name: Notification. MyNotificationNameUserInfo, object: nil, userInfo:["message":"Hello there!", "date":Date()])
リンク
ホワイトハッカー入門(3)
引き続き、Kali Linuxの環境設定を行います。 なかなか肝心な部分に進めません。
ディスクにスペースがあれば、Virtual Boxのクローンを作成すると良いと思います。
- shの変更
- ディレクトリを日本語から英語に変更
- 日本語入力
shの変更
rootのshellが/bin/shだったのでbashに変更しました。
# chsh /bin/bash
ディレクトリを日本語から英語に変更
最初に行うのはディレクトリを日本語から英語に変更します。 作業はターミナル上で行うことが多いですが、その時日本語を入力するのは面倒です。 必要なパッケージをインストールしてから設定します。 確認ダイアログがでますので、Don’t ask againにチェックを入れUpdate Namesを選択します。
# apt-cache search xdg-user-dirs-gtk
# apt-get install xdg-user-dirs-gtk

# LANG=C xdg-user-dirs-gdk-update
日本語入力
日本語入力には、パッケージをインストールした後に、設定を行います。 設定 / Region & Language / 入力ソースで+ボタンを押してAnthyを追加します。 設定ダイアログは、アプリ検索でSettingを入力すると表示されます。 追加した日本語入力を有効に再起動が必要でした。
# apt-get update
# apt-get install uim uim-anthy
#apt-get install ibus-anthy
リンク
ホワイトハッカー入門(2)
引き続き、Kali Linuxのインストールを続けます。
Virtual Boxでは、ホスト機とのコピペやディレクトリを共有するために、additional toolsをインストールする必要があります。 特に、インストールが完了するまで、ホスト機とのコピペは必須です。事前にインストールしておきましょう。
Kali Linux を VirtualBox にインストールする | Webセキュリティの小部屋のページが良くまとまっています。Kali Linuxのインストールの解説ページで最後のあたりにadditional toolsのインストールの説明があります。
私の環境では、インストールが失敗しました。
追記) apt-get install -y linux-headers-$(uname -r)を見落としていました。
# less /var/log/vboxadd-install.log
Makefile:181: *** Error: unable to find the sources of your current Linux kernel. Specify KERN_DIR= and run Make again. Stop
このエラーが出た場合には、カーネルヘッダのインストールが必要となります。
# apt-get install linux-headers-$(uname -r)
Kali Linuxを再起動して、ホスト機とのコピペができれば成功です。 ちなみに、ショートカットは、Shift-Ctrl-C/Vです。ホスト機のショートカットとは異なるので注意が必要です。
リンク
ホワイトハッカー入門(1)
サイバーセキュリティテスト完全ガイド ~Kali Linuxによるペネトレーションテスト~ を参考にしながら、ホワイトハッカーを目指します。
環境は、Mac OS X Sierraですが、書籍はWIndows環境を推奨していますので、途中からWindowsに変わるかもしれません。
まずは、定番のKali Linuxをインストールします。
Kali Linuxは侵入用ツールが満載のLinux Debianベースのディストリビューションです。
ここ(Official Kali Linux Downloads )| Kali Linux)からisoファイルをダウンロードしてインストールします。仮想環境(Virtaul Box)にインストールしました。
※) Bloody Mondayの主人公になるためには、仮想環境をUSBメモリに入れておく必要があります(未確認)。
インストール手順は、Kali Linux を使ってみる : まだプログラマーですが何か?が詳しいです。
起動して、最初に行うのが、環境の更新です。 書籍にも記載されています。 これはルートアカウントで行います。 インタラクティブモードになっているためかなり時間がかかりました。
# apt-get update
# apt-get dist-upgrade
リンク
■TouchID認証を使ってみました
TouchID認証を使ってみました
サンプルアプリ
認証ボタンのみを持つアプリとして作成しました。

起動時
利用可能かどうかチェックします。 LAContext.canEvaluatePolicyを呼び出します。このメソッドは、true/falseを返します。falseの場合、error.localizedDescriptionに説明が入っています。
第1引数をdeviceOwnerAuthenticationWithBiometricsとするとTouch ID認証ができない端末ではエラーになるので、deviceOwnerAuthenticationを使うのが一般的でしょうか?
| LAPolicy | 説明 |
|---|---|
| deviceOwnerAuthenticationWithBiometrics | Touch IDを使った端末のオーナー認証 |
| deviceOwnerAuthentication | Touch IDを使った、あるいはパスコードによる端末のオーナー認証 |
    override func viewDidLoad() {
        super.viewDidLoad()
        // Do any additional setup after loading the view, typically from a nib.
        let context = LAContext()
        var error: NSError?
        let result = context.canEvaluatePolicy(.deviceOwnerAuthenticationWithBiometrics, error: &error)
        if !result {
            authButton.isEnabled = false
            var message = ""
            if let detail = error {
                message = detail.localizedDescription
//                print("error => \(detail.localizedDescription)")
            }
            let alertController: UIAlertController = UIAlertController(title: "アラート表示", message: message, preferredStyle:  UIAlertControllerStyle.alert)
            let defaultAction: UIAlertAction = UIAlertAction(title: "OK", style: UIAlertActionStyle.default, handler:{
                // ボタンが押された時の処理を書く(クロージャ実装)
                (action: UIAlertAction!) -> Void in
                print("OK")
            })
            alertController.addAction(defaultAction)
            self.present(alertController, animated: true, completion: nil)

        }
    }
認証ボタンタップ時
認証します。
LAContext.evaluatePolicyメソッドを呼び出します。

    @IBAction func tapAuthButton(_ sender: UIButton) {
        let context = LAContext()
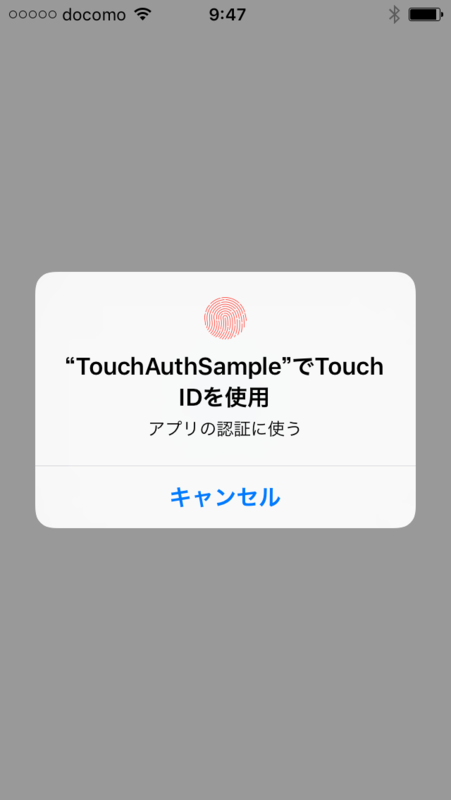
        context.evaluatePolicy(.deviceOwnerAuthenticationWithBiometrics, localizedReason: "アプリの認証に使う") { success, error in
            if success {
                print("available")
                return
            }
            var message = ""
            if let detail = error {
                message = detail.localizedDescription

            }
            let alertController: UIAlertController = UIAlertController(title: "認証", message: message, preferredStyle:  UIAlertControllerStyle.alert)
            // OKボタン
            let defaultAction: UIAlertAction = UIAlertAction(title: "OK", style: UIAlertActionStyle.default, handler:{
                // ボタンが押された時の処理を書く(クロージャ実装)
                (action: UIAlertAction!) -> Void in
                print("OK")
            })
            alertController.addAction(defaultAction)
            self.present(alertController, animated: true, completion: nil)
        }
    }
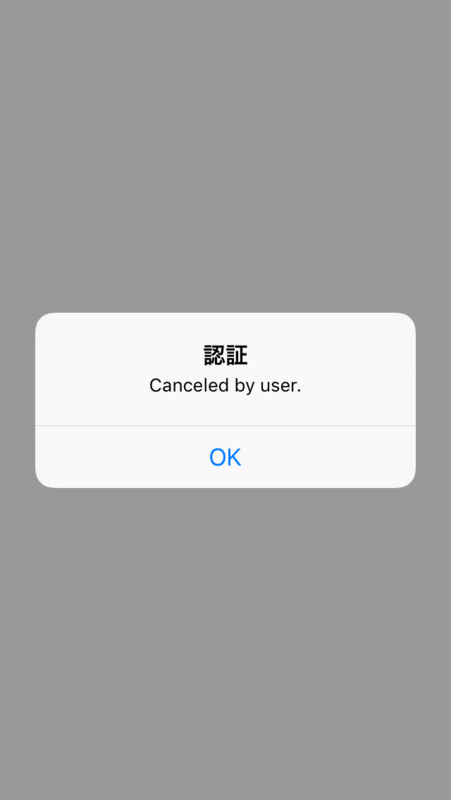
キャンセルが選択された場合は、error.localizedDescriptionにCanceled by userというメッセージが格納されます。

参考
SRACOM APIを使って見ました
概要
Software Design 5月号に付録として付いていました、SORACOM SIMを使ったAPIを試してみました。
維持費用の安いSIMカードとしても使えますが、特長の一つにAPIによるSIMカード操作があります。SIMカードを付けたIoTを状況に応じて操作することができるようになれば今までにないサービスを提供できるかもしれないと感じました。
また、SORACOM EndorseというSIMカードを使った認証はうまい方法だと思いました。
構成・手順
スマートフォン(Android)
このうち、3は雑誌についているクーポン(500円分)を使うための手順です。
- SIMカードをAndroid Nexus5Xに挿入して有効化します。
- SORACOM Endorseを有効にします。
- クーポンを登録します。
- SORACOM Airメタデータサービスを有効化します。
- テザリングします
ノートPC
MacOSX Yosemite(10.11.4)。テザリングを使って、SORACOM SIMを挿しているスマートフォンの回線上で、(Web)APIを実行します。これによって、SIM情報を見たり、通信速度などを変えることができます。
以下、ターミナル上でそうさしました。また、記事中にあるjsonデータを操作するツールjqは、ここにあります。
// SIM情報を取得します。
// ※)一部のデータはXXXXに変更しました。
$ curl -s http://metadata.soracom.io/v1/subscriber
{"imsi":"XXXX","msisdn":"XXXX","ipAddress":"XXXX","apn":"soracom.io","type":"s1.standard","groupId":"XXXX","createdAt":1461534616669,"lastModifiedAt":1462145801291,"expiredAt":null,"expiryAction":null,"terminationEnabled":false,"status":"active","tags":{},"sessionStatus":{"lastUpdatedAt":1462143291785,"imei":"XXXX","location":null,"ueIpAddress":"10.228.24.158","dnsServers":["100.127.0.53","100.127.1.53"],"online":true},"speedClass":"s1.standard","moduleType":"nano","plan":0,"serialNumber":"XXXX","expiryTime":null,"operatorId":"OP0071750211","createdTime":1461534616669,"lastModifiedTime":1462145801291}

// 速度クラスをsq.fastに変更します。
$ curl -sX POST -d '{"speedClass":"s1.fast"}' -H 'Content-Type: application/json' http://metadata.soracom.io/v1/subscriber/update_speed_class
{"imsi":"XXXX","msisdn":"XXXX","ipAddress":"XXXX","apn":"soracom.io","type":"s1.fast","groupId":"XXXX","createdAt":1461534616669,"lastModifiedAt":1462146445481,"expiredAt":null,"expiryAction":null,"terminationEnabled":false,"status":"active","tags":{},"sessionStatus":{"lastUpdatedAt":1462143291785,"imei":"XXXX","location":null,"ueIpAddress":"10.228.24.158","dnsServers":["100.127.0.53","100.127.1.53"],"online":true},"speedClass":"s1.fast","moduleType":"nano","plan":0,"serialNumber":"XXXX","expiryTime":null,"operatorId":"OP0071750211","createdTime":1461534616669,"lastModifiedTime":1462146445481}%