JupyterLabでデバッグ
Jupyterlab v3がリリースされました。 JupyterLab 3.0 is released!. The 3.0 release of JupyterLab brings… | by Jeremy Tuloup | Jan, 2021 | Jupyter Blog
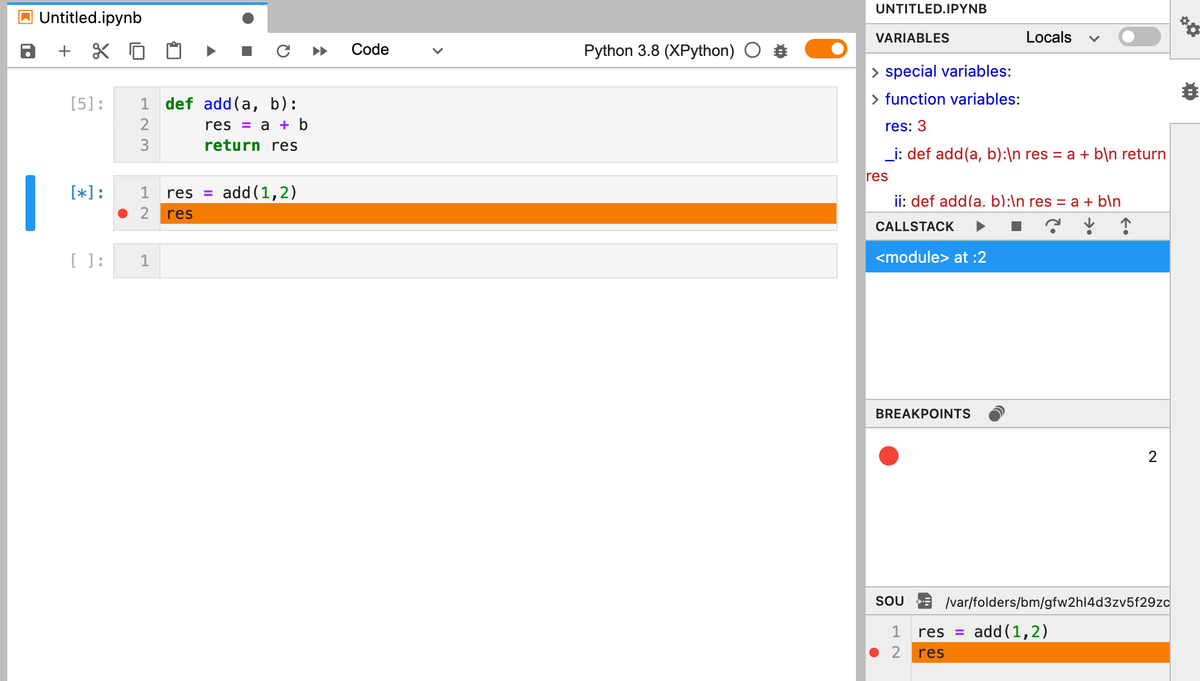
デバッガ(xeus-python)が含まれています。 print文を使ったデバッグから脱却できます。
お約束のvenv
$ python -m venv venv
$ source venv/bin/activate
jupyterlabをインストールします。 JupyterLab 3.0 is released!. The 3.0 release of JupyterLab brings… | by Jeremy Tuloup | Jan, 2021 | Jupyter Blog
$ pip install jupyterlab==3
カーネル(xeus-python)をインストールし、登録します。
$ pip install xeus-python
$ venv/bin/ipython kernel install --user --name=xeus-python --display-name=xeus-py
jupyterlabを起動します。
venv/bin/jupyter-lab
Kaggleのtitanicをしてみました
今年はKaggleのコンペに参加すべく、まずはtitanicから始めてみました。
手順については以下の記事が参考になりました。
機械学習を仕事に使うには? 03_Pythonのコーディング手順を全公開 - Qiita
Jupyter notebookのデータはgithubにあります。
kaggle/titanic at master · unokun/kaggle
トレーニングデータ読み込み
以下のページからtrain.csvをダウンロードします。
Titanic: Machine Learning from Disaster | Kaggle
pandas.DataFrameに読み込みます。
# ライブラリのインポート
import pandas as pd
import matplotlib.pyplot as plt
import seaborn as sns
%matplotlib inline

# トレーニングデータ読み込み
df = pd.read_csv('./train.csv')

# データ表示(一部)
df.head()

変数の説明
train.csvをダウンロードしたページにあるData Dictionaryを参照します。
titanicタスクの場合、Survivalが目的変数、それ以外が説明変数になります。
| Variable | Definition | Key |
|---|---|---|
| survival | Survival | 0 = No, 1 = Yes |
| pclass | Ticket class | 1 = 1st, 2 = 2nd, 3 = 3rd |
| sex | Sex | |
| Age | Age in years | |
| sibsp | # of siblings / spouses aboard the Titanic | |
| parch | # of parents / children aboard the Titanic | |
| ticket | Ticket number | |
| fare | Passenger fare | |
| cabin | Cabin number | |
| embarked | Port of Embarkation | C = Cherbourg, Q = Queenstown, S = Southampton |
変数の概要を調べます。
データのバラツキなどを見る時に使います。titanicの生き残った人より死んだ人の方が多かったことがわかります。
# 説明変数の概要を調べる
df.describe()

データクレンジング
欠損したデータの対応が、データクレンジングと呼ばれます。
まずは、データの欠損有無を調べます。
# データの欠損有無
df.isnull().sum()

欠損値がある場合、1)データを削除する、2)特定の値を設定する方法があります。今回は平均値を設定しました。また、後述の分類(ランダムフォレスト)を実施するためには数値でない変数は使えないので、Cabin、Name、PassengerId、Ticketは説明変数から削除しました。
# 欠損値処理
# 平均値をセットする
df['Fare'] = df['Fare'].fillna(df['Fare'].median())
df['Age'] = df['Age'].fillna(df['Age'].median())
df['Embarked'] = df['Embarked'].fillna('S')

# カテゴリ変数の変換
df['Sex'] = df['Sex'].apply(lambda x: 1 if x == 'male' else 0)
df['Embarked'] = df['Embarked'].map( {'S': 0, 'C': 1, 'Q': 2} ).astype(int)

# 不要な変数削除
df = df.drop(['Cabin','Name','PassengerId','Ticket'],axis=1)
変数の相関を調べます。
生存(Survival)に強く関連する説明変数が旅客クラス(Pclass)、性別(Sex)、料金(Fare)であることがわかります。
# 説明変数の相関を調べる
df.corr()

データの可視化
可視化ライブラリ(seaborn)を使うとデータに対する理解が深まります。
# データ可視化
sns.countplot('Sex',hue='Survived',data=df)

機械学習
データの準備
# https://www.randpy.tokyo/entry/python_random_forest
from sklearn.model_selection import train_test_split

# 説明変数(train_X)と結果に分割(train_y)
train_X = df.drop('Survived', axis=1)
train_y = df.Survived

# トレーニングデータとテストデータ(精度計測用)に分割
# https://docs.pyq.jp/python/machine_learning/tips/train_test_split.html
# test_size: テストデータのサイズ。トレーニングデータのサイズは1-テストデータのサイズ
# random_state: 乱数発生のシード。未指定の場合にはnp.randomが用いられる
(train_X, test_X ,train_y, test_y) = train_test_split(train_X, train_y, test_size = 0.3, random_state = 666)
分類
分類モデルはランダムフォレストを使ってみます。約82%の精度が得られました。
# ランダムフォレスト
# https://ja.wikipedia.org/wiki/%E3%83%A9%E3%83%B3%E3%83%80%E3%83%A0%E3%83%95%E3%82%A9%E3%83%AC%E3%82%B9%E3%83%88
from sklearn.ensemble import RandomForestClassifier
clf = RandomForestClassifier(n_estimators=100, random_state=0)
clf = clf.fit(train_X, train_y)
pred = clf.predict(test_X)

# 精度計算
from sklearn.metrics import (roc_curve, auc, accuracy_score)
fpr, tpr, thresholds = roc_curve(test_y, pred, pos_label=1)
auc(fpr, tpr)
accuracy_score(pred, test_y)

特徴量の影響度を調べます。
性別(Sex)、年齢(Age)、料金(Fare)の影響が強かったことがわかります。データの相関では旅客クラス(Pclass)が高かったのですが、このデータは料金(Fare)と関連があるため、年齢の影響が強くなったのだと考えられます。
# 特徴量の影響度
fti = clf.feature_importances_
print('Pclass, Sex, Age, SibSp, Parch, Fare, Embarked')
print(fti)

参考
coreml(apple)を試してみました
以下の記事を参考にcoreml(apple)を試してみました。
coremltools 3.1の環境構築(2019年11月版) - Qiita
実行環境
環境構築
appleのcoremltoolsを参考に環境構築。
apple/coremltools: Core ML Community Tools.
# 仮想環境作成
$ pip install virtualenv
$ virtualenv coreml
$ coreml/bin/activate

# coreml
(coreml) $ pip install -U coremltools
(coreml) $ pip install keras==2.2.4 tensorflow==1.14.0

# jupyter-labで実行するカーネルをインストール
(coreml) $ pip install ipykernel
(coreml) $ ipython kernel install --user --name=coreml

# jupyter-labインストール
(coreml) $ pip install jupyterlab
カーネルインストールは以下を参考にしました。
実行
jupyter-labを起動します。仮想環境外でもjupyter-labをインストールしている可能性があるので仮想環境のjupyter-labをパスを指定して呼び出した方が確実です。
$ coreml/bin/jupyter-lab

インストールしたカーネルを選択します。
「Kernel/change kernel]メニューをクリック。
インストールしたカーネルの名前を選択します。

画面右上のカーネルが選択したカーネル名になっていることがわかります。

このままだとインストールしたモジュールが使えないのでパスを設定します。
設定前

設定後

インストールしたモジュール(Keras、tensorfow)のバージョンを確認します。


updatable_mnist.ipynbを選択して実行します。問題なく最後まで実行できます。

tensorflowをバージョン指定しない(2.0)場合、OperatorNotAllowedInGraphErrorが発生します。


TODO
作成したモデルをアプリに組み込む予定です。
Flutter(続き)

Flutterに触ってみました
Googleが開発するスマートフォンアプリ環境であるflutterに触ってみました。 iOSとAndroidの両方で動くアプリケーションを開発できます。
作成したアプリが実機で動くところまでは確認できました。後はUI部品(Widget)がどれくらい使えるかですね。
flutter SDKインストール
二つの方法があります。どちらも大差ありません。
zipファイルをダウンロードして解凍する
flutter_macos_v1.9.1+hotfix.6-stable.zip
gitからcloneする
flutter/flutter: Flutter makes it easy and fast to build beautiful mobile apps.
# パスの設定
.zshrcに設定しておくと毎回設定する必要はない。
export PATH="$PATH:[flutterをダウンロード(clone)したディレクトリ]/flutter/bin"

# git版でもflutter dockerすると必要なモジュールをダウンロードしてくれる。
$ flutter doctor
flutter app作成
$ flutter create my_app
Platformごとのセットアップ
iOS setup
install Xcode
すでにcommand-line toolのインストール済みの場合にはなにも実行されません。
 $ sudo xcode-select --switch /Applications/Xcode.app/Contents/Developer
 $ sudo xcodebuild -runFirstLaunch
Set up the iOS simulator
シミュレータを起動します。
$ open -a Simulator
run a simple Flutter app
iOSのシミュレータを起動しておくと、iOSアプリが起動します。
$ cd my_app
$ flutter run
Downloading ios tools...                                            4.8s
Downloading ios-profile tools...                                    3.2s
Downloading ios-release tools...                                   12.9s

Launching lib/main.dart on iPhone 11 Pro Max in debug mode...
Running Xcode build...

 ├─Assembling Flutter resources...                          11.2s
 └─Compiling, linking and signing...                        17.9s
Xcode build done.                                           35.9s
Syncing files to device iPhone 11 Pro Max...
 9,682ms (!)

🔥  To hot reload changes while running, press "r". To hot restart (and rebuild
state), press "R".
An Observatory debugger and profiler on iPhone 11 Pro Max is available at:
http://127.0.0.1:57661/vBeZHgO6_xE=/
For a more detailed help message, press "h". To detach, press "d"; to quit,
press "q".

Deploy to iOS devices
実機にdeployするためには、Xcodeからインストールする必要があります。Xcodeプロジェクトが作成されるのですね。
$ ls ios
Flutter                 Runner                  Runner.xcworkspace
Frameworks              Runner.xcodeproj        ServiceDefinitions.json

$ open Runner.xcodeproj
実機の場合には、signinする必要があります。

モジュール管理にはcocoapodsを使っているようです。
$ sudo gem install cocoapods
Password:
Fetching: thread_safe-0.3.6.gem (100%)
Successfully installed thread_safe-0.3.6
Fetching: tzinfo-1.2.5.gem (100%)
...
Fetching: cocoapods-1.8.4.gem (100%)
Successfully installed cocoapods-1.8.4
30 gems installed
実機にインストールします。

Android setup
Install Android Studio
割愛
Set up the iOS simulator(emulator)
Android StudioからAVD Managerを起動する。

run a simple Flutter app
$ flutter run

Using hardware rendering with device Android SDK built for x86. If you get
graphics artifacts, consider enabling software rendering with
"--enable-software-rendering".
Launching lib/main.dart on Android SDK built for x86 in debug mode...
Running Gradle task 'assembleDebug'...
Running Gradle task 'assembleDebug'... Done                        79.4s
✓ Built build/app/outputs/apk/debug/app-debug.apk.
Installing build/app/outputs/apk/app.apk...                         3.5s
I/Choreographer( 5078): Skipped 56 frames!  The application may be doing too much work on its main thread.
D/EGL_emulation( 5078): eglMakeCurrent: 0xd8067180: ver 3 0 (tinfo 0xefade5e0)
I/OpenGLRenderer( 5078): Davey! duration=1339ms; Flags=1, IntendedVsync=231214310519, Vsync=232147643815, OldestInputEvent=9223372036854775807, NewestInputEvent=0, HandleInputStart=232154779768, AnimationStart=232154810458, PerformTraversalsStart=232154812593, DrawStart=232172042436, SyncQueued=232188163101, SyncStart=232221350860, IssueDrawCommandsStart=232221553060, SwapBuffers=232468630724, FrameCompleted=232587351657, DequeueBufferDuration=71181000, QueueBufferDuration=2190000,
Syncing files to device Android SDK built for x86...
D/EGL_emulation( 5078): eglMakeCurrent: 0xebd85420: ver 3 0 (tinfo 0xebd836d0)
Syncing files to device Android SDK built for x86...            13,622ms (!)
🔥  To hot reload changes while running, press "r". To hot restart (and rebuild
state), press "R".
An Observatory debugger and profiler on Android SDK built for x86 is available
at: http://127.0.0.1:58674/R0KmIpo2wI4=/
For a more detailed help message, press "h". To detach, press "d"; to quit,
press "q".

実機にインストールします。

その他
device一覧
Android
$ flutter devices
2 connected devices:

ANE LX2J                  • SCV7N18522006899 • android-arm64 • Android 9 (API
28)
Android SDK built for x86 • emulator-5554    • android-x86   • Android 9 (API
28) (emulator)
iPhone
$ flutter devices
1 connected device:

宇野昌明のiPhone • a5f6160a18c068493881fcd58ecf93eb8b81438a • ios • iOS 13.1.3
emulators一覧
$ flutter emulators
2 available emulators:

Nexus_5X_API_28         • Nexus 5X API 28         • Google • android
apple_ios_simulator     • iOS Simulator           • Apple  • ios
Centos7でgit 2.x系を使う
古いバージョンのgitを削除
$ sudo yum remove git
最新版のgitが入っているレポジトリを取得
$ sudo yum -y install https://centos7.iuscommunity.org/ius-release.rpm
デフォルト無効にする
# sudo cat vi /etc/yum.repos.d/ius.repo

[ius]
name = IUS for Enterprise Linux 7 - $basearch
baseurl = https://repo.ius.io/7/$basearch/
enabled = 0      # 1→0に変更
repo_gpgcheck = 0
gpgcheck = 1
確認
iusパッケージが無効になっていればOK
$ sudo yum repolist all
...
ius-archive/x86_64                 IUS for Enterprise Linux 7 - Arc 無効
ius-archive-debuginfo/x86_64       IUS for Enterprise Linux 7 - Arc 無効
...
インストール
$sudo yum install git --enablerepo=ius --disablerepo=base,epel,extras,updates
エラーが発生したので以下を試しました。
$sudo yum --enablerepo=ius list git2u
存在していたのでインストール。
$ sudo yum install git2u --enablerepo=ius
centosやめてubuntuに変えようかと思う今日この頃...