Tensor flow:reactivekk社のデモを動かしてみました
概要
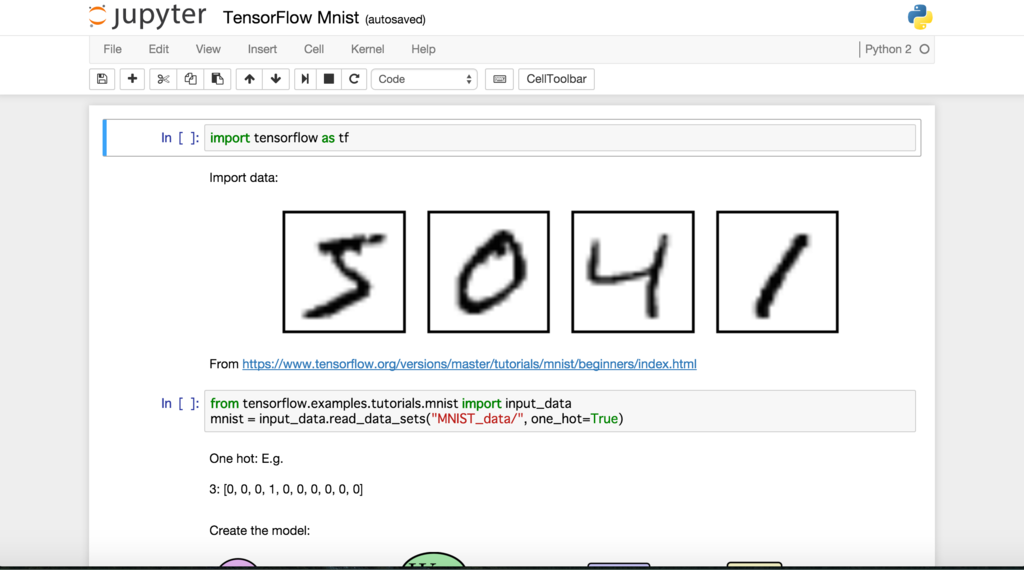
前回は、GoogleのTensorflowを試してみました。今回は、はじめてのテンサーフローワークショップに参加しました - Qiitaテンサーフローワークショップの題材となった、reactivekk社が公開しているデモを動かしてみました。ipython notebookを使って、結果をブラウザ上に出力するデモです。計算モデルが可視化されるすぐれものです。
tensor flow実行環境を構築します
python環境を構築します
pythonはHomebrewを使ってインストールしました。
$ brew install python
$ python -V
Python 2.7.10
python用パッケージマネージャーをインストールします。
$ sudo easy_install pip
$ pip --version
pip 7.1.2 from /Library/Python/2.7/site-packages/pip-7.1.2-py2.7.egg (python 2.7)
tensor flow実行環境を準備します
virtualenvを使います。virtualenvは以下の特長を持っています。詳しくは、Amazon.co.jp: Pythonプロフェッショナルプログラミング第2版を参照してください。
- OSの管理権限を持っていなくてもPythonライブラリをvirtualenv内だけに自由にインストール出来ます。
- 目的別にライブラリをインストールするので不要なライブラリに邪魔されることがありません。
- 使わなくなったらディレクトリごと削除できます。
- activate/deactivateコマンドでvirtualenv環境ON/OFFを切り替えることができます。
MacOSX Yosemiteから、一部のディレクトリにファイルを書き込むことができなくなったため、virtualenvを使った方が問題が発生する可能性が少ないです。
適当なディレクトリにvirtualenvを作成して、activateします。
$ cd work/python
$ virtualenv tensorflow
$ source tensorflow/bin/activate
(tensorflow)[~/work/python]$
tensorflowをインストールします。
(tensorflow)[~/work/python]$ pip install --upgrade https://storage.googleapis.com/tensorflow/mac/tensorflow-0.5.0-py2-none-any.whl
reactivekk社のデモ実行環境を構築します
python notebookが動く環境を構築します。
jupyterをインストールしないと、ImportError: No module named notebook.notebookappというエラーがでます。詳しくは、 pip install jupyterを参照してください。
$ pip install ipython
$ pip install numpy matplotlib
$ pip install jupyter
python notebookを実行します。ブラウザ上にページが開きます。
(tensorflow)[~/work/python]$ ipython notebook
[I 06:19:41.965 NotebookApp] Serving notebooks from local directory: /Users/unokun/work/python
[I 06:19:41.965 NotebookApp] 0 active kernels
[I 06:19:41.965 NotebookApp] The Jupyter Notebook is running at: http://localhost:8888/
[I 06:19:41.966 NotebookApp] Use Control-C to stop this server and shut down all kernels (twice to skip confirmation).

reactivekk社のデモを実行します
モジュールをダウンロードします
適当なディレクトリにモジュールを取得します。
$ git clone https://github.com/reactivekk/tensorflow-getting-started.git
モジュールをアップロードします
python bookで実行している画面でuploadボタンを押下し、ダウンロードしたファイル(TensorFlow Mnist.ipynb)をアップロードします。以下が出力されれば成功です。

おまけ
pipでインストールしたモジュール一覧は以下のコマンドで調べることができます。
(tensorflow)[~/work/python]$ pip freeze
appnope==0.1.0
backports-abc==0.4
backports.ssl-match-hostname==3.5.0.1
certifi==2015.11.20.1
cycler==0.9.0
decorator==4.0.6
functools32==3.2.3.post2
gnureadline==6.3.3
ipykernel==4.2.2
ipython==4.0.3
ipython-genutils==0.1.0
ipywidgets==4.1.1
Jinja2==2.8
jsonschema==2.5.1
jupyter==1.0.0
jupyter-client==4.1.1
jupyter-console==4.1.0
jupyter-core==4.0.6
MarkupSafe==0.23
matplotlib==1.5.1
mistune==0.7.1
nbconvert==4.1.0
nbformat==4.0.1
notebook==4.1.0
numpy==1.10.4
path.py==8.1.2
pexpect==4.0.1
pickleshare==0.6
ptyprocess==0.5
Pygments==2.1
pyparsing==2.0.7
python-dateutil==2.4.2
pytz==2015.7
pyzmq==15.2.0
qtconsole==4.1.1
simplegeneric==0.8.1
singledispatch==3.4.0.3
six==1.10.0
tensorflow==0.5.0
terminado==0.6
tornado==4.3
traitlets==4.1.0
wheel==0.24.0
関連資料
swift:SafariWebViewControllerを使ってみました
概要
iOS 9: Getting Started With SFSafariViewController - Envato Tuts+ Code Tutorialを参考に、SafariViewControllerを使ってみました。SafariViewControllerは、iOS9で導入されたUIコントロールです。WebViewより簡単にアプリの中に、しかもSafariの全機能を持つWeb閲覧機能を組み込むことができるようになります。
WebView機能
アプリにWeb閲覧機能を組み込む方法です。
- Safariアプリと連携する方法
- WebViewを使う方法
- SafariViewControllerを使う方法
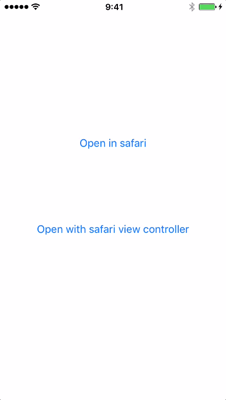
SafariViewControllerを使うサンプルアプリを作成しました。ボタンをタップするとGoogle検索画面をオープンします。

Safariアプリ連携
関連づけられたアプリ(Safari)でURLをオープンします。
ボタン押下イベントに以下の処理を追加するだけです。
    @IBAction func openInSafari(sender: UIButton) {
        let url = NSURL(string: self.urlString)!
        UIApplication.sharedApplication().openURL(url)
    }
アプリの切り替えが行われるため、SafariアプリでどのURLにアクセスしているかをアプリでは知ることができません。

WebViewを使う方法
どのURLにアクセスしたかをアプリで知ることはできますが、Safariでの履歴や機能が使えるわけではありません。また、画面遷移するための処理が必要になります。
SafariViewControllerを使う方法
SafariViewControllerを使うためには、ボタン押下時に、SafariViewControllerを開きます。Safariのイベントは、SFSafariViewControllerDelegateのメソッドで取得します。
class ViewController: UIViewController, SFSafariViewControllerDelegate {
    private var urlString:String = "https://google.com"

    // 最初に設定したURLがロードされた時に呼ばれる
    func safariViewController(controller: SFSafariViewController,
        didCompleteInitialLoad didLoadSuccessfully: Bool) {
            print("safariViewController")

    }

    // ユーザーが「完了(Done)」をタップした時に呼ばれる
    func safariViewControllerDidFinish(controller: SFSafariViewController)
    {
        print("safariViewControllerDidFinish")
        controller.dismissViewControllerAnimated(true, completion: nil)
    }
}
SafariViewControllerを使うと、Safariの全機能が使えます。さらに、SFSafariViewControllerDelegateを実装することによって Safariでの操作履歴も取得することができます。

関連資料
TensorFlowのチュートリアルを試してみました
概要
TensorFlowは、Googleがオープンソースで公開している機械学習環境です。DeepLearning - ディープラーニングの有名ライブラリ5種を最短距離で試す半日コース(TensorFlow, Chainer, Caffe, DeepDream, 画風変換) - Qiitaを参考に、チュートリアルを試してみました。
インストール
TensorFlowのインストールにはvirtualenvを選択するのが安全です。
$ brew python
$ python -V
Python 2.7.10

$ sudo easy_install pip
$ sudo pip install --upgrade virtualenv
$ virtualenv --system-site-packages ~/tensorflow
$ cd ~/tensorflow
(tensorflow)$ pip install --upgrade https://storage.googleapis.com/tensorflow/mac/tensorflow-0.5.0-py2-none-any.whl
正しくインストールされているかどうか確認します。
(tensorflow)bash-3.2$ python
Python 2.7.10 (default, Oct 23 2015, 18:05:06)
[GCC 4.2.1 Compatible Apple LLVM 7.0.0 (clang-700.0.59.5)] on darwin
Type "help", "copyright", "credits" or "license" for more information.
>>> import tensorflow as tf
>>> hello = tf.constant('Hello TensorFlow!')
>>> sess = tf.Session()
>>> print sess.run(hello) Hello TensorFlow!
virtualenvではなくpipインストールにを選択した場合、失敗する可能性があります。その場合には、--ignore-installed sixを付けるとうまくいくかもしれません。
Six issue when installing package #3165失敗した場合
Installing collected packages: setuptools, protobuf, wheel, numpy, tensorflow
  Found existing installation: setuptools 1.1.6
    Uninstalling setuptools-1.1.6:
Exception:
Traceback (most recent call last):
  File "/Library/Python/2.7/site-packages/pip-7.1.2-py2.7.egg/pip/basecommand.py", line 211, in main
    status = self.run(options, args)
成功した場合
$ sudo pip install --upgrade https://storage.googleapis.com/tensorflow/mac/tensorflow-0.6.0-py2-none-any.whl --ignore-installed six
Collecting setuptools (from protobuf==3.0.0a3->tensorflow==0.6.0)
  Downloading setuptools-19.2-py2.py3-none-any.whl (463kB)
    100% |████████████████████████████████| 466kB 1.1MB/s
Installing collected packages: six, setuptools, protobuf, wheel, numpy, tensorflow
  Running setup.py install for protobuf
Successfully installed numpy-1.8.0rc1 protobuf-3.0.0a3 setuptools-1.1.6 six-1.10.0 tensorflow-0.6.0 wheel-0.26.0
Tutorial
DeepLearning - ディープラーニングの有名ライブラリ5種を最短距離で試す半日コース(TensorFlow, Chainer, Caffe, DeepDream, 画風変換) - Qiitaに書いている手順を実行してみます。
$ cd ~/tensorflow
$ git clone --recurse-submodules https://github.com/tensorflow/tensorflow
$ vi tensorflow/tensorflow/examples/tutorials/mnist/fully_connected_feed.py
30,31行目
#from tensorflow.examples.tutorials.mnist import input_data
#from tensorflow.examples.tutorials.mnist import mnist
import input_data
import mnist
$ python tensorflow/tensorflow/examples/tutorials/mnist/fully_connected_feed.py
Successfully downloaded train-images-idx3-ubyte.gz 9912422 bytes.
Extracting data/train-images-idx3-ubyte.gz
Successfully downloaded train-labels-idx1-ubyte.gz 28881 bytes.
Extracting data/train-labels-idx1-ubyte.gz
Successfully downloaded t10k-images-idx3-ubyte.gz 1648877 bytes.
Extracting data/t10k-images-idx3-ubyte.gz
Successfully downloaded t10k-labels-idx1-ubyte.gz 4542 bytes.
Extracting data/t10k-labels-idx1-ubyte.gz
can't determine number of CPU cores: assuming 4
I tensorflow/core/common_runtime/local_device.cc:25] Local device intra op parallelism threads: 4
can't determine number of CPU cores: assuming 4
I tensorflow/core/common_runtime/local_session.cc:45] Local session inter op parallelism threads: 4
Step 0: loss = 2.32 (0.036 sec)
Step 100: loss = 2.19 (0.005 sec)
Step 200: loss = 1.98 (0.005 sec)
(略)
Step 700: loss = 0.66 (0.005 sec)
Step 800: loss = 0.71 (0.006 sec)
Step 900: loss = 0.70 (0.006 sec)
Training Data Eval:
  Num examples: 55000  Num correct: 47040  Precision @ 1: 0.8553
Validation Data Eval:
  Num examples: 5000  Num correct: 4303  Precision @ 1: 0.8606
Test Data Eval:
  Num examples: 10000  Num correct: 8653  Precision @ 1: 0.8653
Step 1000: loss = 0.54 (0.016 sec)
Step 1100: loss = 0.66 (0.122 sec)
(略)
Step 1800: loss = 0.43 (0.012 sec)
Step 1900: loss = 0.46 (0.005 sec)
Training Data Eval:
  Num examples: 55000  Num correct: 49235  Precision @ 1: 0.8952
Validation Data Eval:
  Num examples: 5000  Num correct: 4506  Precision @ 1: 0.9012
Test Data Eval:
  Num examples: 10000  Num correct: 9011  Precision @ 1: 0.9011
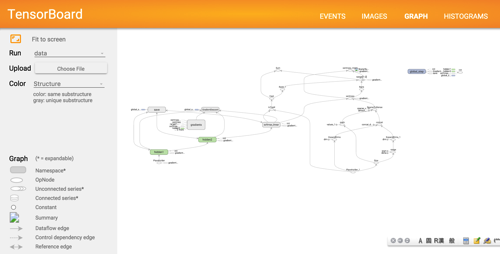
TensorBoard
計算結果のログを可視化できます。
(tensorflow)$ tensorboard --logdir=/Users/unokun/tensorflow/data
モデル

平均エントロピー

今後
Pocket: TensorFlowによるディープラーニングで、アイドルの顔を識別するのような顔認識をしてみたい。
関連情報
- TensorFlow -- an Open Source Software Library for Machine Intelligence
- DeepLearning - ディープラーニングの有名ライブラリ5種を最短距離で試す半日コース(TensorFlow, Chainer, Caffe, DeepDream, 画風変換) - Qiita
- TensorFlow MNIST For ML Beginners チュートリアルの実施 - Qiita
- Googleが提供する機械学習ライブラリ TensorFlow を1時間で試してみた | freshtrax | btrax スタッフブログ
- Python - tensorflowの初心者向けMNISTチュートリアルをやってみた。 - Qiita
- Pocket: TensorFlowによるディープラーニングで、アイドルの顔を識別する
swift:正規表現を使って文字検索してみました
概要
正規表現を使って文字検索してみました。
いろいろな方法があると思いますが、Stringクラスのextensionを使うのが簡単そうです。NSRegularExpression Class Referenceはわかりにくいですね。
iOS - Swift2.0で正規表現を簡単に扱う。 - Qiitaがわかりやすかったです。
import Foundation

extension String {
    func findAll(input: String) -> [String]? {
        do {
            let re = try NSRegularExpression(pattern: self, options: NSRegularExpressionOptions.CaseInsensitive)
            let matches = re.matchesInString(input, options: [], range:NSMakeRange(0, input.characters.count))
            var results: [String] = []
            for match in matches {
                results.append((input as NSString).substringWithRange(match.range))
            }
            return results
        } catch let error {
            print("\(error)")
            return nil
        }
    }
}
let input = "&l=99182670&m=99182671"
if let matches = "(\\d{8,})".findAll(input) {
    for match in matches {
        print(match)
    }
}
Performance
Performanceについて、以下のような記載がありますので、*や+を多く使う正規表現はパフォーマンスが悪い可能性があります。
NSRegularExpression implements a nondeterministic finite automaton matching engine. As such, complex regular expression patterns containing multiple * or + operators may result in poor performance when attempting to perform matches — particularly failing to match a given input. For more information, see the “Performance Tips” section of the ICU User Guide.
また、パフォーマンス観点では、オートマトン(NSRegularExpression)の作成コストが高いので使い回すことができるよう設計した方が良いかもしれません。
JavaだとPatternをstatic変数(例:Logicクラス)に持つことがあります。
関連資料
Swift言語:Dropbox APIを使ってみました
概要
Developers - Dropboxを参考にDropbox APIを使ってみました。
公式サイトのInstallに書かれているPodfileでインストールされる、SwiftyDropbox (2.0.3)/Alamofire(3.14)のバージョンではデータ取得に失敗します。
SwiftyDropboxでDropboxの簡単なファイル操作をするの記事と同じ、SwiftyDropbox(1.0.2)/Alamofire (2.0.2)をインストールするとうまく動作しました。
インストール
うまくデータが取得出来るバージョン
$ cat Podfile
platform :ios, '8.0'
use_frameworks!

pod 'SwiftyDropbox', '~> 1.0.1'

[~/Desktop/iPhoneApps/swift/HelloDropbox]$ pod install
Updating local specs repositories

Analyzing dependencies
Downloading dependencies
Installing Alamofire (2.0.2)
Installing SwiftyDropbox (1.0.2)
Generating Pods project
Integrating client project

Pod installation complete! There is 1 dependency from the Podfile and 2 total
pods installed.
データ取得に失敗するバージョン
$ cat Podfile
platform :ios, '8.0'
use_frameworks!

pod 'SwiftyDropbox'

[~/Desktop/iPhoneApps/swift/HelloDropbox]$ pod install
Updating local specs repositories

Analyzing dependencies
Downloading dependencies
Installing Alamofire (3.1.4)
Installing SwiftyDropbox (2.0.3)
Generating Pods project
Integrating client project

Pod installation complete! There is 1 dependency from the Podfile and 2 total
pods installed.
以下のエラーメッセージが出力されます。
message String? "Error in call to API function \"users/get_current_account\": request body: could not decode input as JSON" Some
実装
公式サイトのTutorialを参考に、Application.swiftとViewController.swiftに処理を追加します。
実行
以下のメッセージが出た場合には、Dropboxアプリがインストールされていない可能性があります。
-canOpenURL: failed for URL: "dbapi-2://1/connect" - error: "(null)",-canOpenURL: failed for URL: "dbapi-2://1/connect" - error: "(null)",
接続
以下のメッセージがコンソールに出力された場合には接続成功です。ここで、APIKEYはアプリのキーです。
db-APIKEY
Success! User is logged into Dropbox with token: XXXXX-XXXXX-XXXX
2016-01-11 09:06:24.673
データ取得
Tutorialのコードが成功するとコンソールに情報が出力されます。
*** Get current account ***
Hello ユーザアカウント!
*** List folder ***
Folder contents:
...
関連情報
ディープラーニング入門:DeepBeliefSDKを使ってみました
概要
ディープラーニング入門~DeepBeliefSDKを使う~ - Intelligent Technology's Technical Blogで紹介されていたDeepBeliefSDKを使ってみました。
DeepLearningを使った画像認識の背景を知りたい場合には、 Deep Learningと画像認識 ~歴史・理論・実践~が役立ちそうですが、難しくよく分かりませんでした。
実行
iOS版
Xcode 7.2 + iOS(9.2)の環境でビルド・実行ともに成功しました。
Build Settingsを変更する必要がありました。

MacBook Proを画像認識した結果です。Notebook、Laptopが上位に表示されています。

Android版
Android 6系(Nexus 5)では動作しませんでした。Android 5.x系(ASUS Zenfone2)では動作しました。
iOS版の認識結果と少し違うようです。カメラの性能に関係しているのでしょうか?
MacOSX版
コンパイルエラーになります。これはFramework Search Pathに開発者のパスが設定されているためです。適切に修正するとビルドできます。

関連資料
swift:OpenCVをみ使って見ました
概要
を参考(というかソースコードそのまま)に、OpenCVを使ってみました。
開発環境: Xcode7.2(Swift 2.1)、 動作環境:iPod Touch(iOS: 9.2)
修正
参考にした記事は、swiftのバージョンが少し古いため3点ほど修正が必要でした。
Swiftのバージョンに起因する修正(1)
Optional型のデータ処理、例えばクラスキャスト(as)でunwrapを追加しました。
Swiftのバージョンに起因する修正(2)
CGBitmapInfoとCGImageAlphaInfoの結合部分でエラーが発生していました。以下の記事を参考に修正しました。
ios - Combining CGBitmapInfo and CGImageAlphaInfo in Swift - Stack OverflowXcodeに起因する修正
実機用にビルドするとリンクエラーが発生しました。シミュレータ向けのビルドでは問題なし。
Build SettingsでEnable BitcodeをNOに修正しました。
iOS9 - Xcode7GMでビルドすると「does not contain bitcode.」とか言われる - Qiita結果
青い円が認識している顔です。開始位置(x,y)と幅、高さを取得することができます。

iOSで顔認識だけであれば、環境構築を含め、CIDetectorを使う方が簡単です。しかし、iOS/Androidの両方で使いたい、あるいは顔認識以外の画像処理を行う場合にはOpenCVを使うことになります。C++ベースの開発ができるかどうかですね。
今後
顔以外の画像認識をしてみたいと思っています。
iOS - 「顔以外」のものを画像認識する - Qiita